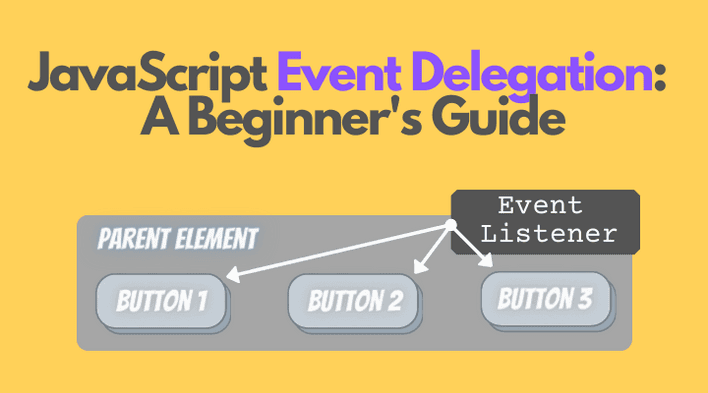
Event delegation is a useful pattern because it allows listening for events on many elements with just one event listener.
Let's see how event delegation works.
1. Why event delegation?
Let's log a message to the console when an HTML button is clicked.
To make it work, you need to select the button, then use addEventListener() method to attach an event listener:
<button id="buttonId">Click me</button><script> document.getElementById('buttonId') .addEventListener('click', () => console.log('Clicked!'));</script>
That's the way to go to listen for events on a single element, particularly a button.
What about listening for events on multiple buttons? Here's a possible implementation:
<div id="buttons"> <button class="buttonClass">Click me</button> <button class="buttonClass">Click me</button> <!-- buttons... --> <button class="buttonClass">Click me</button></div><script> const buttons = document.getElementsByClassName('buttonClass'); for (const button of buttons) { button.addEventListener('click', () => console.log('Clicked!')); }</script>
Take a look at the Codesandbox demo to see how it works.
The buttons list is iterated for (const button of buttons) and a new listener is attached to each button. Also, when a button is added or removed from the list, you'd have to manually remove or attach event listeners.
Is there a better approach?
Fortunately, when using the event delegation pattern, listening for events on multiple elements requires just one event listener.
The event delegation uses specifics of the event propagation mechanism. To understand how event delegation works, it is important to understand the event propagation first.
2. Event propagation
When you click the button in the following HTML:
<html> <body> <div id="buttons"> <button class="buttonClass">Click me</button> </div> </body></html>
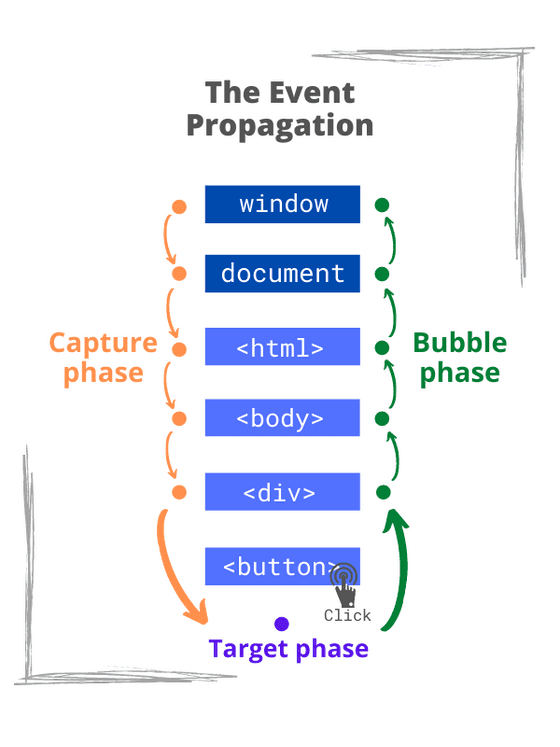
On how many elements does the click event gets triggered? Without a doubt, the button itself receives a click event. But also... all button's ancestors, and document, and window.
A click event propagates in 3 phases:
- Capture phase — Starting from
window,document, and the root element, the event dives down through ancestors of the target element - Target phase — The event gets triggered on the element on which the user has clicked
- Bubble phase — Finally, the event bubbles up through ancestors of the target element until the root element,
document, andwindow.

The third argument captureOrOptions of the method:
element.addEventListener(eventType, handler[, captureOrOptions]);
lets you catch events from different phases.
- If
captureOrOptionsargument is missing,falseor{ capture: false }, then the listener captures the events of target and bubble phases - If the argument is
trueor{ capture: true }, then the listener listens for events of capture phase.
The following event handler listens for click events in the capture phase that occured on <body> element:
document.body.addEventListener('click', () => { console.log('Body click event in capture phase');}, true);
In this Codesandbox demo, when clicking the button, you can see in console how the event propagates.
Ok, how does event propagation help capture events of multiple buttons?
The algorithm is simple:
- Attach the event listener to the parent element of buttons
- Catch the bubbling event when the button is clicked.
This is how event delegation works.
3. Event delegation
Let's use the event delegation to catch clicks on multiple buttons:
<div id="buttons"> <!-- Step 1 --> <button class="buttonClass">Click me</button> <button class="buttonClass">Click me</button> <!-- buttons... --> <button class="buttonClass">Click me</button></div><script> document.getElementById('buttons') .addEventListener('click', event => { // Step 2 if (event.target.className === 'buttonClass') { // Step 3 console.log('Click!'); } });</script>
Open the Codesandbox demo and click any button — you'll see 'Click!' message logged to console.
Instead of attaching the event listeners directly to the buttons, you delegate listening to the parent <div id="buttons">. When a button is clicked, the click event bubbles and the listener of the parent element catches it (recall the event propagation?).
Using the event delegation requires 3 steps:
Step 1. Determine the parent of elements to watch for events
In the example above, <div id="buttons"> is the parent element of the buttons.
Step 2. Attach the event listener to the parent element
document.getElementById('buttons') .addEventListener('click', handler) attaches the event listener to the parent element of buttons. This listener reacts to button clicks because the button click event bubbles through ancestors (thanks to the event propagation).
Step 3. Use event.target to select the target element
When a button is clicked, the handler function is invoked with an argument: the event object. The property event.target is the element upon which the event has been dispatched, which in the example is a button:
// ... .addEventListener('click', event => { if (event.target.className === 'buttonClass') { console.log('Click!'); } });
Now you can see the benefit of the event delegation pattern: instead of attaching listeners to every button like it was done earlier, thanks to event delegation just one event listener is necessary.
(As a side note, event.currentTarget points to the element to which the event listener is attached directly. In the example, event.currentTarget is <div id="buttons">.)
4. Summary
When a click event happens (or any other event that propagates):
- The event travels down from
window,document, root element and through the ancestors of the target element (capture phase) - The event occurs on the target (the target phase)
- Finally, the event bubbles up through the target's ancestors until the root element,
documentandwindow(the bubble phase).
This is event propagation.
The event delegation is a useful pattern because you can listen for events on multiple elements using one event handler.
Making the event delegation work requires 3 steps:
- Determine the parent of elements to watch for events
- Attach the event listener to the parent element
- Use
event.targetto select the target elements
Do you have any questions regarding the event propagation or event delegation? If so, please write a comment below!


